Blog
How To Make A Handmade Christmas Card
Click here to see our brand new Essential Christmas Card Guide: The 2019 Edition!
Yes, it’s not long now until we hear those Christmas jingles and songs in every shop and store! Making your own cards is a way of really getting yourself in the festive mood, such as wrapping presents and dressing the tree. The thought of your cards standing out from the rest and having pride of place on display should spur you on.
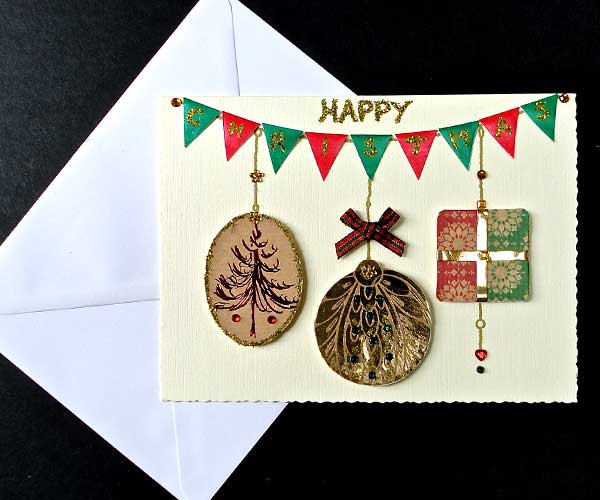
The card I am making today is my ‘Christmas Bunting and Bauble card’. Bunting has become so popular all year round for many events and Christmas is one of them, often replacing the sparkly streamers. It is also great fun making your own bunting out of paper or material you have collected – something to keep the children occupied!
This card incorporates the bunting with hanging baubles and a wrapped present. As you can see, I have a selection of festive papers and practical things required to make this card, with a small sketch of my intended design.
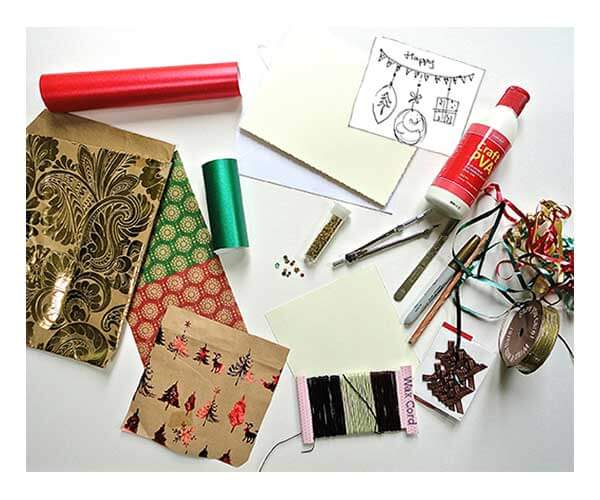 Materials you will need.
- Choice of plain greetings card – e.g. cream 150 X 200mm
- 3 X sheets of patterned paper
- 2 X sheets of plain paper
- A piece of plain card
- Craft glue – glue pen
- Double-sided foam pads
- Cocktail stick
- Gold ink pen
- Pencil, compass ruler
- Gold glitter
- Glass gems in matching colours
- Pack of small bows
- Wax or gold cord – optional
- Coloured or gold shines ribbon
- A good cutting board or surface to work on
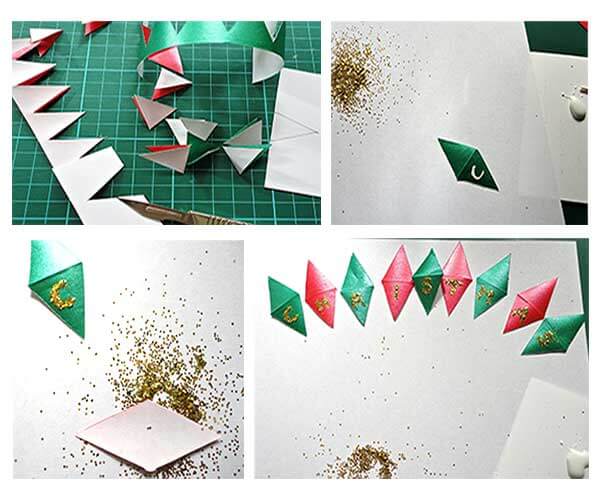 This design will be be landscape so as to accommodate the sway of bunting. Starting here with the bunting, I have drawn a triangle 20 X 20 mm and cut it out of a strip of card. Then, fold a length of your plain coloured paper, with the colour inside, and using the triangle stencil you have created cut along with the wide end on the fold. Each triangle is going to contain a letter, spelling the word ‘Christmas’, alternating the colours of green and red, so we need nine in total. With a gold pen, then write each letter on the same side of the diamond; using a cocktail stick write over the letter in glue and dip into the glitter, then tap off any extra glue and use the other end of the stick to clear away any unwanted bits. Arrange alternately, so they are already in order to attach to the card.
 Next cut a circle – 55mm diameter, a square-45mm diameter and an oval 60mm in height out of card. Using these as templates, place on your patterned paper, a different one for each and cut round. Having cut out the shapes then affix to the card; here I have used a glue pen, which is an easy way to distribute glue onto small pieces of delicate paper.
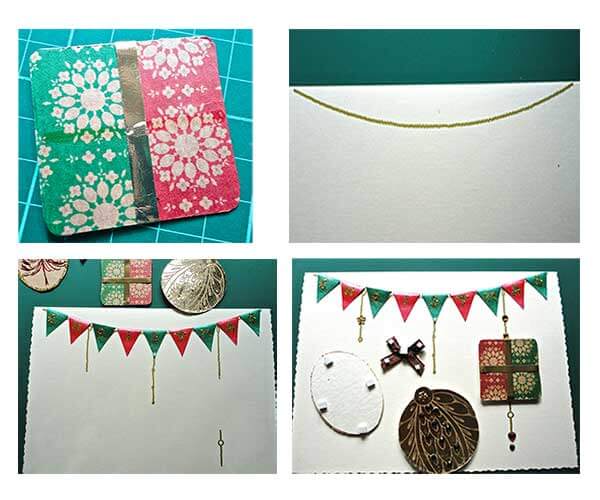 The square shape looks more authentic if you round off the corners when the glue has dried. I want this to look as real as possible; so by criss-crossing gold ribbon, then sellotaping the back, gives that wrapped present look.
Often, when I start a new handmade card I know my initial idea may change as I go along. Using wax or gold cord to support the bunting and hang the baubles, is a great idea but I feel will just become too complicated. I think if you use the bunting as a separate idea on its own then it would look great. So, here I decided to draw an arc in gold pen to display the bunting and also with the same pen position and draw the hanging strings for the baubles. Position the pieces on the card before drawing the gold lines so you get the spacing right. Then put the double-sided sticky foam pads on the back of each and stick them firm. The bunting can be folded and stuck just at the pointed ends to keep that open 3D effect when attached, with the tops just above the gold arc line so it looks as if it is threaded through.
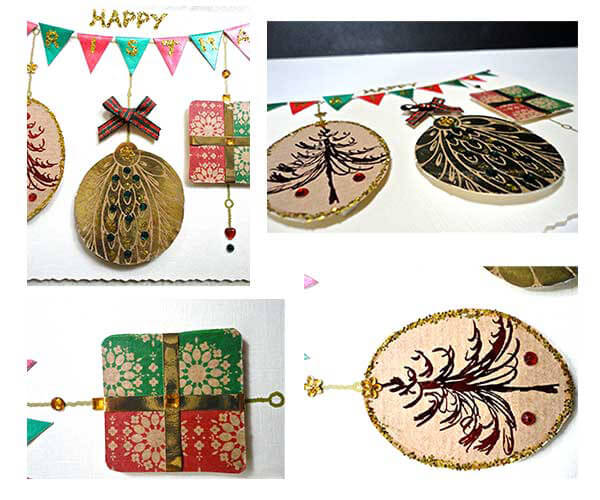 To finish off the card, the text ‘Happy’ is drawn above the bunting again using glue and gold glitter. A nice tartan red and green bow is placed above the circle and glass gems are positioned on the hanging threads and the baubles.
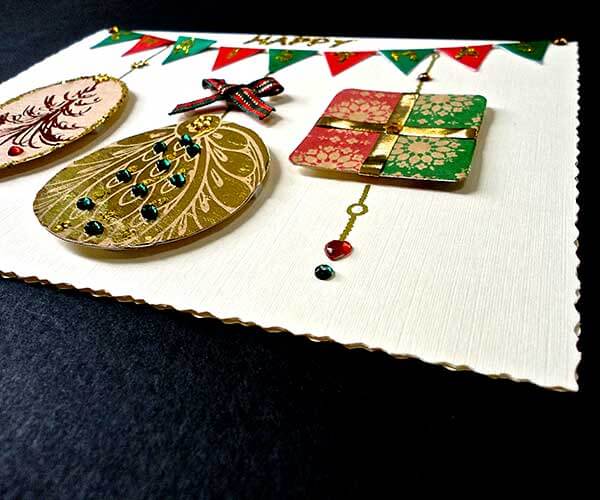
As you can see, the 3D effect works well and the contrast of the flat drawn parts accentuates the prominent decorative images. If I was to sell this card on my website I would print the drawn elements and have the 3D pieces ready to attach; otherwise it would be too time consuming to produce a large number. But, for special cards for family and friends you could easily made a dozen using lots of different Christmas wrapping paper left over from last year.
From one idea comes many more – the bunting would make a great card on its own, or why not try a group of presents, a collection of many patterns and ribbons or simply one very large bauble, which would be impressive made from a patchwork of pattern! The ideas from this one example are endless, so just enjoy creating your own individual designs for your handmade cards to send this Christmas.