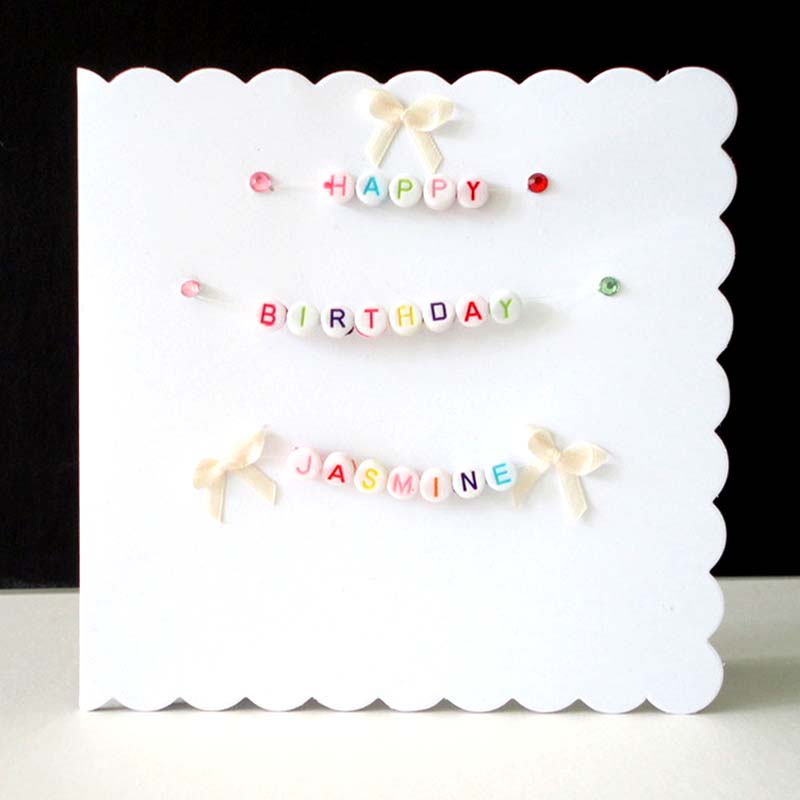
Happy Birthday cards are the most popular cards sold to celebrate an event. We all look forward to receiving cards on our special day no matter what age we are.
I have designed so many Birthday cards, both handmade and printed with a set message, covering subjects from tropical animals, British wildlife, underwater scenes, rockpools, hand-painted and photographed flowers from the garden to antique office accessories and simply just text!
Today, I want to show you how to make a fun personalised card for a child’s Birthday, it will be initially for a young girl, but I will give suggestions how to adapt it for a boy or even for a teenager.
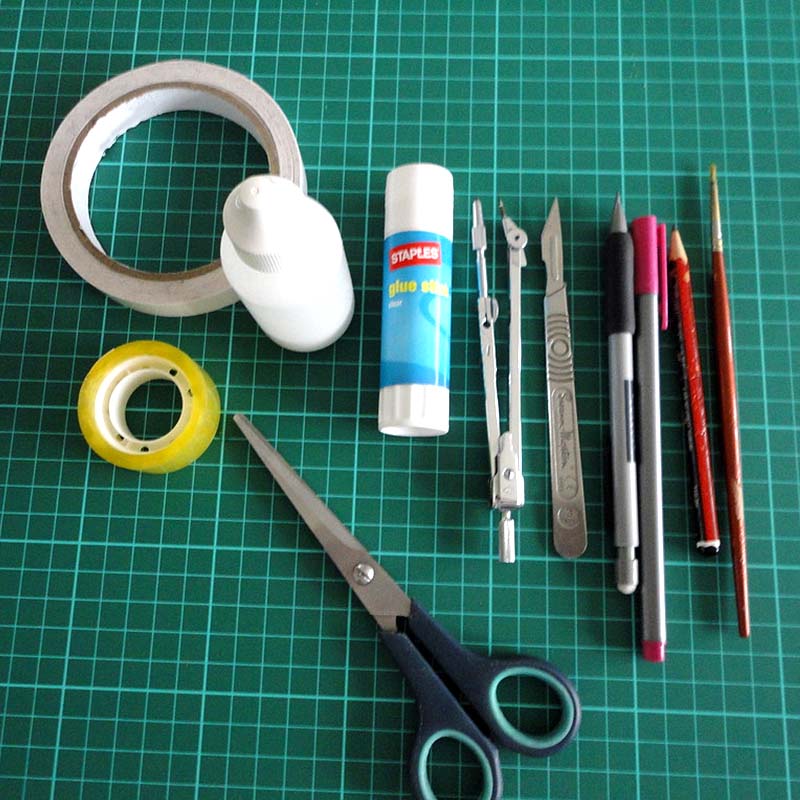
What you will need to make your own handmade Birthday card
Equipment:
- Scissors
- Scalpel
- Ruler
- Pencil
- Glue stick
- Clear drying glue
- Compass point or darning needle.
- Sellotape or masking tape
- Pink felt pen
- Paint brush/ pink water colour.
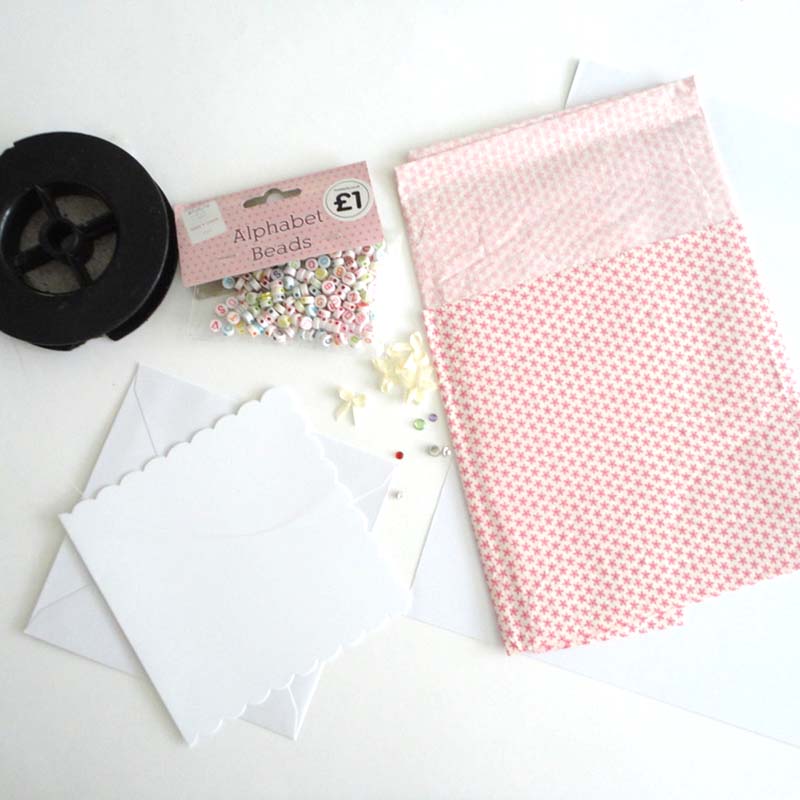
Materials:
- Plain white card & envelope 120 x 120 mm (or make your own from a sheet of A4 card)
- Extra piece of white card
- Patterned paper
- Glass gems – green & pink
- Alphabet beads
- Clear wire or beading thread- coloured craft wire or elastic coloured thread.
- Mini bows
- Most of these items and those featured in the ‘Extra Inspiration’ are available from Baker Ross, The Works & Hobbycraft
The card I have chosen has a scalloped edge, but you may wish to keep it simple if you are making your own from piece of white card.
I always prefer to draw the image out on paper first to get the spacing right without marking the actual card, so I’ve just drawn round the card to get the spacing and measurements correct.
The top two holes are 20mm from the top of the card and 35mm in from each side. The middle two holes are 25mm down from the first holes (45mm from top) and 20mm in from each side. The third row down is 35mm from row above (80mm from top) and 30mm in from each side. You may want to work out your own spacing, if the name is shorter on the third row you can bring the points in a little or out if the Christian name is longer.
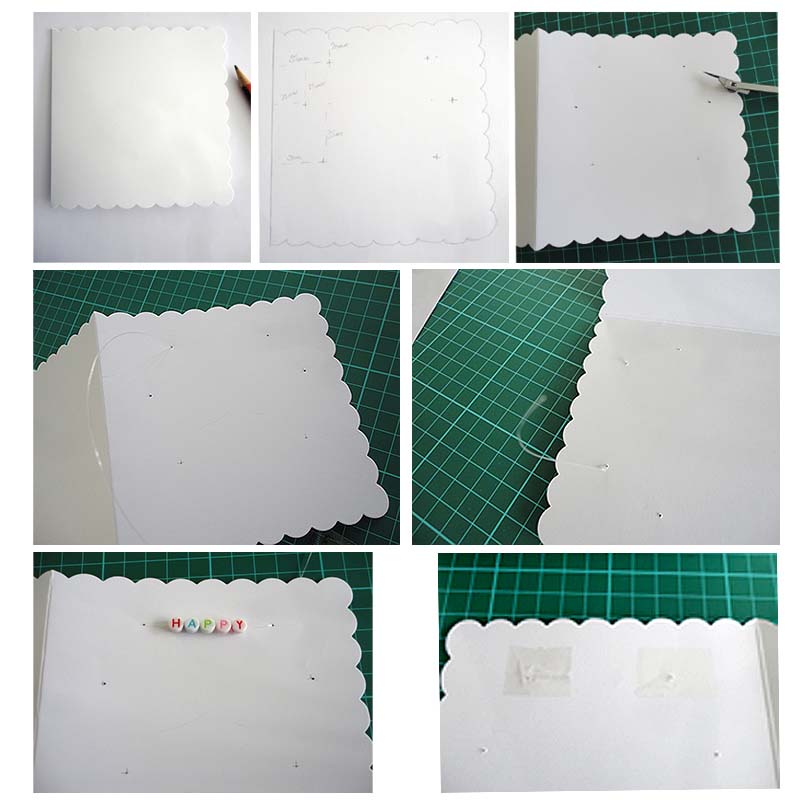
I have pierced the holes with a compass, but a darning needle is fine too. Thread the first piece of wire through, knot at the back. Then, thread the beads on, and feed the wire through the second hole, leave enough to knot again before you cut. To keep this wire neat and flat stick it down with either Sellotape or masking tape at each end. Follow this method with the other two rows of wire and letters.
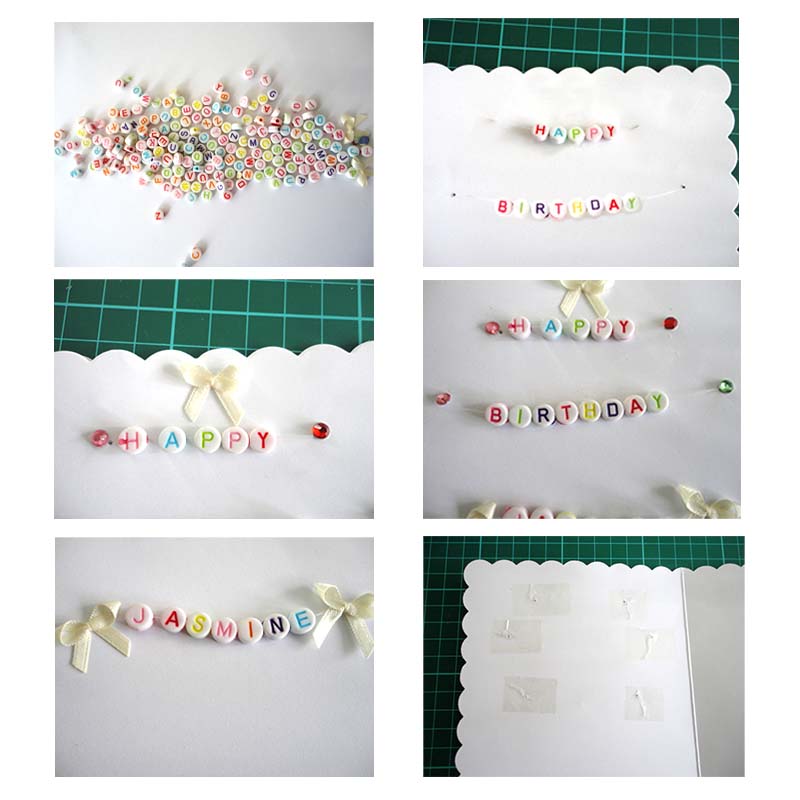
When all three rows are done, just go over the Sellotape to make sure it is firmly stuck down. Then you can start to embellish with glass gems, bows whatever you like. These are glued in place and left to dry.
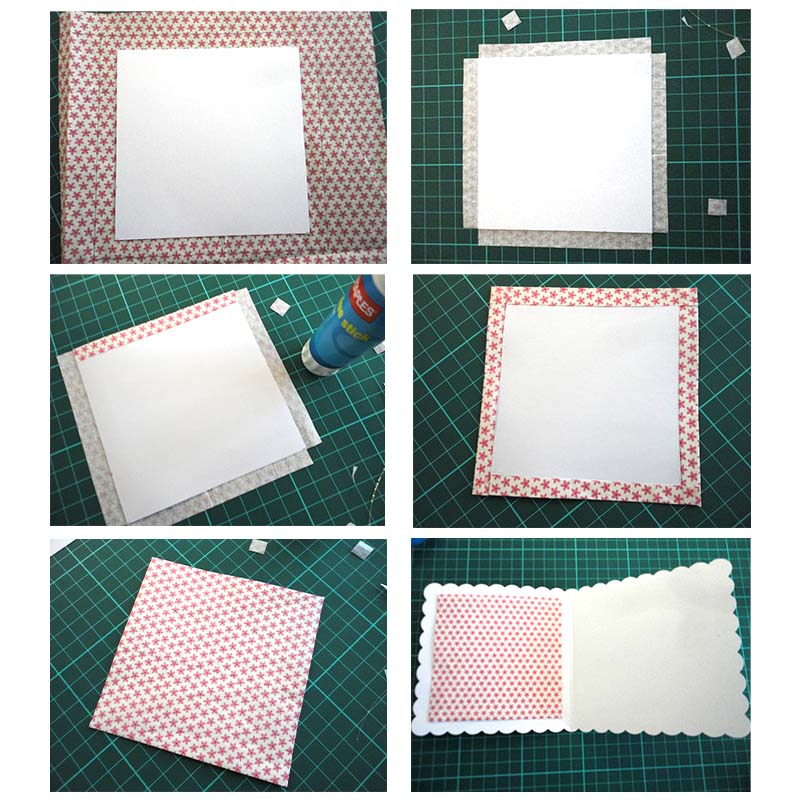
Of course, the inside of the card is not very attractive with wire and Sellotape visible, so we are going to make a pretty backing. This will cover our handy work and at the same time enhance the card design.
Cut a square 10.5 x 10.5cms from your white card, place it on your patterned paper leaving an extra centimetre each side for folding over. Cut small squares out of the corners so the paper does not over-lap when stuck down; I used a glue stick here as it spreads easily and dries quickly. This can then be positioned on the inside cover of the card and glued in place.
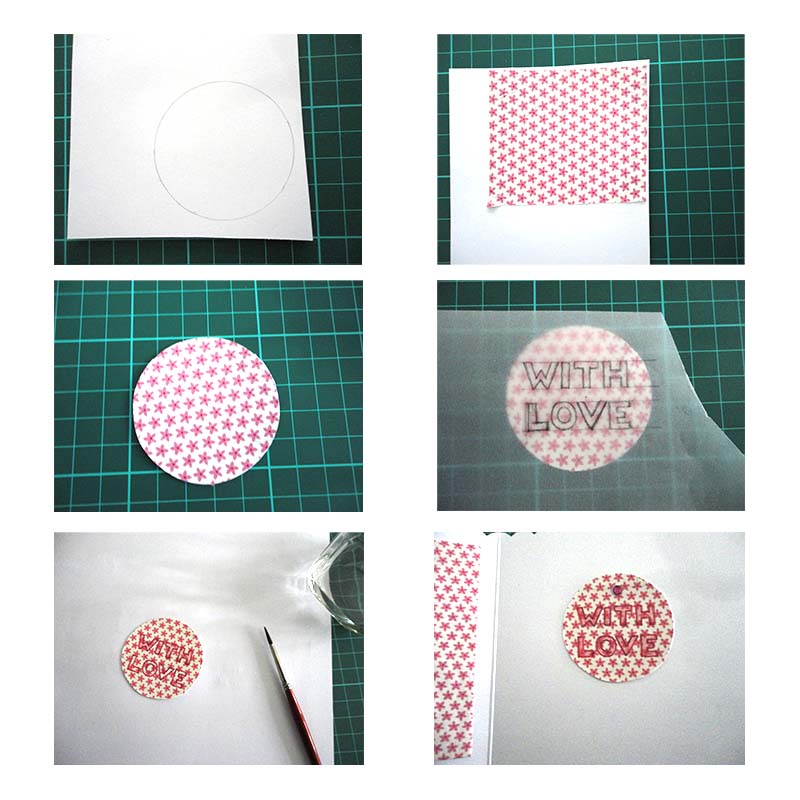
I think most handmade cards should have a message inside, after all you must know the person you are sending this special card to, so it may be personal.
Firstly, draw and cut a circle, about 5cms in diameter from your white card. You can use a compass or anything you have around about the right size to get your template. Adhere your patterned paper flat to one size then trim around the card.
I’ve used the squares on my cutting board to get my text evenly drawn on tracing paper. Then trace the text onto the patterned circle, outline in pink felt pen. I have filled in the letters with a water colour paint. Place in the centre of the card and glue flat, once secure you can add any embellishments you wish, this example has just one large pink glass gem.
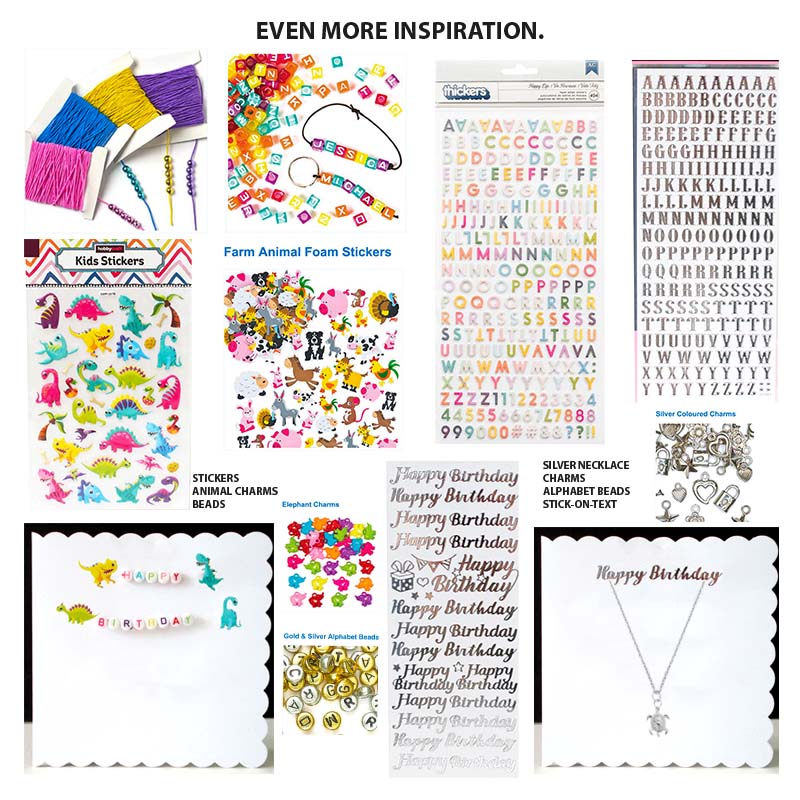
I like to think that my design ideas for handmade cards have many options, they can easily be transformed for different ages, people and occasions by looking for inspiration on craft or gift websites.
As an extra, in this Alphabet bead card, you could easily attach length of elastic beading thread made into a bow inside the card so the Birthday girl can use the beads as a bracelet at a later date.
For a boy, the glass gems and bows can be replaced with animal/dinosaur stickers. If you feel too many beads are a problem, then use foam backed letters, they may be ideal for some of the text like ‘Happy Birthday’.
The idea of displaying gifts on cards is not new, but for a slightly older daughter, granddaughter or friend, silver charms would be a lovely idea, threaded on strands instead of beads. Or, why not create a card and gift in one with a silver necklace attached or a fashionable broach.
I hope, you enjoy making these cards and the extra inspiration gets you thinking of even more fun and unique ideas to delight your friends and family!

